Windows XP had many shortcomings but despite that it was the best running windows OS ever. In advent of time we saw Windows evolution from XP to currently running Windows 8, bugs were reported, interface became more user and performance spiked up. All the upgrades made the usability of windows in a better and efficient way but with a compromise with the running of old software’s. There are many software’s that was designed best for their optimum performance in Windows XP but now fails to run in the newer version of Windows.

The newer version of the Windows usually comes with a 32 or 64 bit version only but XP was limited to 16 bit. And computer is very particular in running the related software in the related bit operating system. There are software’s that still performs better in Windows XP. Although majority has shifted or upgraded to newer version but still they prefer XP sometimes.
We all know that Turbo C is commonly used in Windows Operating system and we also know that Turbo C is a 16 bit compiler that was originally developed for Windows operating system up to the XP version, but it is getting very hard to keep up with the trend when it comes to using both 32/64 bit operating system and 16-bit compiler of ‘Turbo C’ at same time. People are more inclined towards the newer version of Windows Vista/ Seven and in a few days we might see a shift to Windows 8 too.
The main reason for this paradigm shift lies in the stability of the operating system in usage. When compared Windows XP proves to be unstable whereas Windows Seven proves to be very stable. The newer version of the Windows comes in either 32 bit or 64 bit version only, and it is not an easy task to run a 16 bit compiler in a higher version of windows. Turbo C works pretty directly in windows XP, just you need an installation but the newer version can be tweaked a little for the running of 16 bit compiler of Turbo C.
Follow these simple steps to run Turbo C in Windows 7 operating system:
1. First of all Download Turbo C/C++ simulator on your desktop.
2. Run the file for installation.
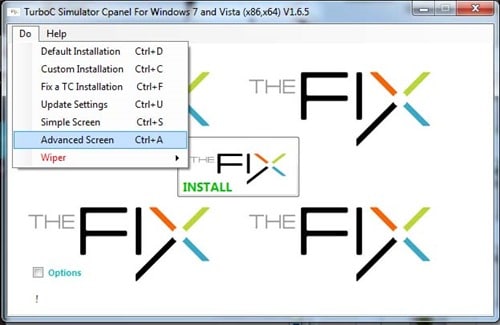
3. Soon after the installation you will notice a “Turbo C simulator control panel icon” in your desktop and if the icon is not present then search it the start.
4. Right click on this icon and “run it as administrator.”
5. Once you have run it, a “dialogue box” will appear.
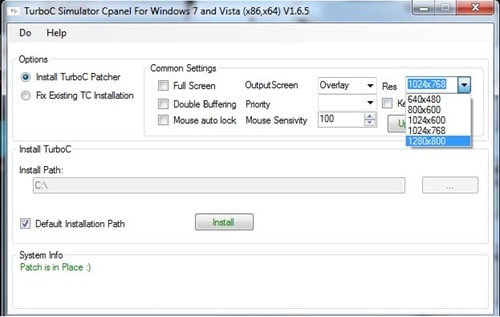
6. Click on the DO bar at the top left corner of the dialogue box and select “Advanced Screen” option.

7. This setting mainly “adjusts the resolution”, so select the resolution the same as that of your desktop resolution.

8. Uncheck the option that is not necessary. Better leave the setting in default.
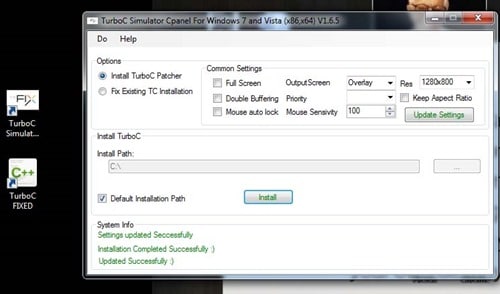
9. Finally click Install.
10. As soon as you are done a new icon pops out that shows ‘Turbo C FIXED’.

So whenever you need to run your programs, simply click on icon with name “Turbo C Fixed” and I’m sure you will be able to write and run programs. So give try to this amazing tweak and don’t forget to share your experience with us.


Hi, This is very simple tutorial that anyone can get basic idea related to turbo c . So thank you very much for your valuable service. I would like to thank. I am pleased to know all that things, which we want about c programming. It s a very helpful and useful to us
facebook for is hack