

Knowing asphalt crack filling can add to your self-sufficiency and bring enormous savings from having to spend on contractors. There are different means of filling asphalt cracks and that is exactly what we are going to talk about today.
Sealant
Primarily, you need to ensure the dryness of the surrounding region. It is advisable to undertake crack filling on sunny days when there is no probability of rain. The main aim here is to fill the cracks and prevent the entry of water. Once you have made sure that the surface is dry, you can use a screwdriver, chisel, or jagged pieces of asphalt to remove surrounding vegetation. Make sure to pull out asphalt pieces that might fall into the cracks as the entire sealing process will become unstable if the sealant sticks to a loose body.
After brushing away the debris hanging around the edge of the crack, you can blow compressed air to remove debris from the crack and ensure its total cleanliness. Now you will have to mix the asphalt crack sealant properly and load it into a caulk gun. But before doing this, you will have to cut the tip using scissors so that spout isn’t bigger than the crack itself. For doing this, you can stick a wire hanger inside the tube tip for breaking the seal. Now the rod on the gun has to be pulled back properly for inserting the tube of sealant base before squeezing the trigger. Doing this will allow easy passage of the sealant out of the tip. In case of problems, you need to recheck the seal.
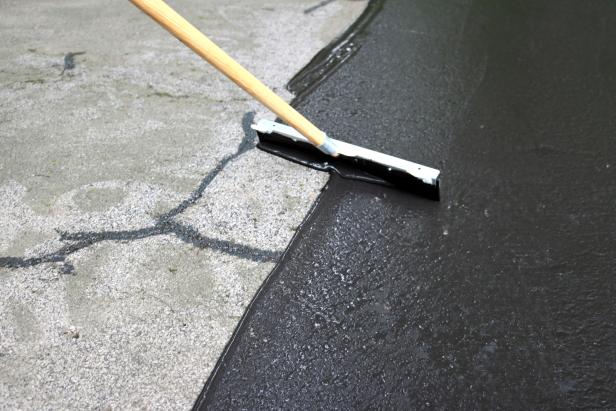
Ultimately, the sealant has to be applied starting from the bottom of the crack throughout its length. You need to layer the sealant and then use the trowel to even out the sealant and tramp it down the crack. More sealant has to be applied if it pushes below the top of the crack. It is advisable not to walk or drive over the repaired path for 48 hours. Sealant needs some time to solidify and so you should refrain from applying much pressure on the asphalt for a few days.
Melt-In Filler
Use an angle grinder for widening out the crack and next dig out all vegetation with a screwdriver or chisel. Doing this will ensure that the melt-in filler adheres to all sides of the crack. Next, you need to remove all signs of debris by blowing compressed air into the crack. Skipping this step will cause the debris to stick to the sealant rather than the crack walls. A screwdriver or chisel can be used for jamming the rope throughout the length of the crack. In case of deep cracks, you can layer a second length of crack filler rope over the first one.
You can use a hammer for smashing the rope around 2.5mm below the crack surface. A propane torch can be used for melting the crack filler rope which starts leveling out into the crack. If the filler starts burning, you can simply blow out the flames and repeat the process. A trowel mix can be applied to the crack after the filler has cooled down. It takes about 20 minutes to cool down and a second coat can be applied if needed once the patch has dried overnight. If a depression forms in the morning, another layer of trowel mix has to be spread to even out your driveway.
Final Words
Sealants are cheaper alternatives but they do not win any brownie points in the department of durability. Using a melt-in filler costs more but lasts longer. Whatever be your choice, you should start with a hot asphalt crack filler machine in mild weather conditions as that will assist the sealant in expanding evenly.