

If you’re the one who’s not satisfied with the setting menu of your android mobile and now you want to add items and change the layout of the Settings, then this article is your cup of tea.
This article is all about XDA Recognized Contributor Quinny899‘s tutorial using which you can edit the settings menu on your Android Device. But the question is why someone wants to add items and change the layout of the Settings. And the reasons are:
- The overall layout is not according to your desire and bugging you a little
- You might think that some settings are a bit too tedious to reach.
- Or you have seen your desired setting in customs rooms but you don’t know how doing it yourself.
So above reasons forced you to edit android menu setting, then I’m sure that after reading this tutorial you will be pro in doing all this. Also you’ve different reason which is not mentioned above then you can also share with us using the comment section. So without further ado lets we start with our guide.
This guide sorted into different categories of your intended modification, that will covers:
- Decompiling Settings.apk
- Editing Strings.xml
- Editing the settings options icon
- Adding options to the setting’s header
- Adding dividers in the main settings screen
- Rearranging the settings order
- Adding items to sub-menus
- Adding Developer settings to the Android 4.2 settings menu
- Recompiling Settings.apk
Note: Each part of this guide will be rated on how hard it is for the general person. (Out of 5 stars, 5 being hardest)
Stuff You’ll Need for the guide
1. Apktool (And therefore Java too)
2. A suitable Text Editor for your OS. For Windows, Notepad++ is best. And for Linux Geany is recommended. In this guide Quinny899 has used Geany on Ubuntu OS
3. Zipsigner on your device (for ease of use)
4. adb
NOTE: If you are using Linux, run everything, including apktool and your text editor/file manager as ROOT/SUDO
So lets we start with:
First: Decompiling Settings.apk
Difficulty: ★★☆☆☆
1. First of all open command windows in suitable location, where apktool.jar is also located and then pull our your apk from your device.
adb pull /system/app/Settings.apk
2. After that you need to pull and install the framework from your device to apktool
adb pull /system/framework/framework-res.apk
java -jar apktool.jar if framework-res.apk
3. And then, decompile your Settings.apk
java -jar apktool.jar d -s Settings.apk
Second: Editing the String of your Setting apk
Difficulty: ★★☆☆☆
1. First open a file manager and after that go Settings where it is decompiled
2. Here look for res/xml/settings_headers.xml and open in your text editor
3. Simply find the header which you want to edit. And in this we will change “Developer settings” Noobs keep out. Also we need to change the string referenced in this code:
<header android:icon="@drawable/ic_settings_development" android:id="@id/development_settings" android:title="@string/development_settings_title" android:fragment="com.android.settings.DevelopmentSettings" />
Now we need to change the android:title reference, so open your Strings.xml, for your language (if it’s not in there, open the default one)
You can find the string (use Ctrl+F) which we found previously, so that we can search for “development_settings_title”
<string name="development_settings_title">Developer options</string>
After that change the bit between the > and the < to what you want:
<string name="development_settings_title">Noobs keep out</string>
4. After that save and proceed to recompiling
Third: Editing the Settings option’s icon
Difficulty: ★★★☆☆
1. Again open a file manager and then go to where the Settings has decompiled to
2. Again look for res/xml/settings_headers.xml and open in your text editor
3. Locate the header you wish to change. In this one we will edit the “Development Settings” to have the “ic_settings_advanced” icon (included in CM based ROMs only)
4. Now search the header which you want to edit, You need to edit this one:
<header android:icon="@drawable/ic_settings_development" android:id="@id/development_settings" android:title="@string/development_settings_title" android:fragment="com.android.settings.DevelopmentSettings" />
5. After that simply edit the android:icon location to the icon according to your wish. You will find icons in res/drawable-hdpi, mdpi, ldpi and xhdpi (depending on ROM)
We need to change it to ic_settings_advanced, so it like:
<header android:icon="@drawable/ic_settings_advanced" android:id="@id/development_settings" android:title="@string/development_settings_title" android:fragment="com.android.settings.DevelopmentSettings" />
6. You can also proceed to recompiling, if don’t want to add icons
7. Follow below step for adding icons:
If you want icons that fit perfectly you can check this zip from Google: Download
- First of all look for all the icons which you want to add and don’t forget to choose the icons resolution which perfectly fits your screen(can be found with the dimension of current ic_settings icons in the apk)
- After that copy it to the correct folder (hdpi, mdpi, xhdpi, ldpi)
- Try to name it something similar (ic_settings_<name>)
- Then, refer to it in the xml, using @drawable/ic_settings_<name>
8. And then, proceed to recompiling
Fourth: Adding options to the settings headers
Difficulty: ★★★★☆
Note: In adding settings you can open things such as GooManager for updates quickly and easily from the menu with “About phone” and “Developer settings” in it
1. Here you need to open your decompiled settings_headers.xml
2. After that look for location where you want to add an option and then, add a new line:
Add this code:
<header android:icon="@drawable/ic_settings_name" android:id="@id/id" android:title="@string/title">
        <intent android:targetPackage="pkgName" android:action="android.intent.action.MAIN" android:targetClass="pkgName.Activity" />
    </header>
3. What to change:
- Here you need to replace the android:icon with the one you want to add(for more info see “adding/changing icons”)
- Add a title to values/strings.xml and reference it in android:title
- Also replace the android:targetPackage to the package name of the app which you want to open. You can found this in the AndroidManifest of that particular app
- Also replace the android:targetClass to the package name, followed by the activity you want to open, You can also found about this particular app’s AndroidManifest
- And replace the android:id to an id that you can add in values/ids.xml. You can also delete it if you want.
4. Proceed to recompiling
Adding dividers to settings
Difficulty: ★★★☆☆
Now for adding to the main settings screen:
1. Simply open your settings_headers.xml
2. And look for location where you want to add a divider
3. Add the code which is shown below:
<PreferenceScreen android:title="@string/title" android:key="key">
What you need to change:
- First of all change the android:id to one which you added in values/ids.xml. You can also delete it if you want.
- And also change the android:title to your title in strings.xml
4. If this is what you want, then you can also proceed to recompiling
Adding to the submenus:
- Now you need to open the submenu which you want to edit’s xml (they’re quite obvious of which one is which)
- Now look for location where you want to add a divider
- And then, you need to add following code:
<PreferenceScreen android:title="@string/title" android:key="key">
And add below code just before the next divider:
</PreferenceScreen>
What you need to change:
- Now you need to change your title in strings.xml with android:title
- And then change the key to one which you want
iv. Proceed to recompiling
Fifth: Reordering Settings
Difficulty: ★★☆☆☆
1. Now you need to open one out of the settings_headers.xml or a submenu, because the process is the same
2. After that cut and then paste the different options to the order which you want
3. That all we need to done in this. Now proceed to recompiling
Sixth: Adding items to submenus
If you want to add a “Credits” option to your “About device” menu? Below will cover all guide for that
Difficulty: ★★★☆☆
1. Open your submenu xml you want (device_info_settings.xml is the about device submenu)
2. And then search the desired location of your new option and make a new line
3.) You need to paste the following code:
<Preference android:title="@string/title" android:key="key" android:summary="@string/summary" style="?android:preferenceInformationStyle" />
What you need to change:
- First of all change android:title to the title which you added in values/strings.xml
- After that change the android:key to the one you want
- At last simply change the android:summary to the longer text that you want that you added to values/strings.xml
4. Now you need to proceed to recompiling
Bonus: Forcing “Developer settings” to be available by default on 4.2
Difficulty: ★★☆☆☆
1. Now open your settings_headers.xml
2. And look for the following code:
<header android:icon="@drawable/ic_settings_development" android:id="@id/development_settings" android:title="@string/development_settings_title" android:fragment="com.android.settings.DevelopmentSettings" />
3. Now you need to change the id from development_settings to development_settings_force
<header android:icon="@drawable/ic_settings_development" android:id="@id/development_settings_force" android:title="@string/development_settings_title" android:fragment="com.android.settings.DevelopmentSettings" />
4. Now open the values/ids.xml
5. And add the following code which is shown below:
<item type="id" name="development_settings_force">false</item>
6. And then, proceed to recompiling
Last: Recompiling
Difficulty: ★★☆☆☆
1. Now again open the command window which you used to decompile, in the same location
2. And run the code which is shown below:
java -jar apktool.jar b Settings
3. Now push the new, unsigned apk to your device:
adb push Settings/dist/Settings.apk /sdcard/
4. Now in your android device, you need to Zipsigner and select the Settings.apk using the in/out button
5. After that select “platform” on the dropdown.
6. And then press sign
7. After that you need to run the following codes in the command window on the PC, when its done
Note: Some people might need to run ‘adb root’ first
adb remount
adb shell cp /system/app/Settings.apk /system/app/Settings.bak
adb shell cp /sdcard/Settings-signed.apk /system/app/Settings.apk
8. And last thing you need to do is reboot your device. You’re done, you have successfully edit the settings menu on your Android device.
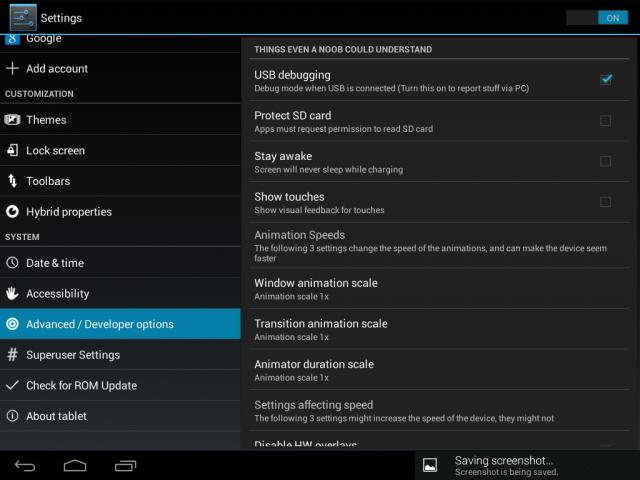
That’s it you’re done and to motivate you to have a look at the snapshot which is show below;
Frequently asked question
1. My apk doesn’t recomplile!
If you face this issue, all you need to do is look into command window, it will definalty tell you where the error is, try to fix that issue.
2. My new settings doesn’t appear!
Make sure you sign it properly and try that thing again and again. Else, you’re out of luck.
If you still not able to fix above error of you facing any kind of error you can simply drop a message at original thread created by Quinny899